Imagine turning your Raspberry Pi 5 into a powerful AI image generator without writing a single line of code. Sounds futuristic? It’s entirely possible today, thanks to the rapid rise of no-code AI tools and the sheer power of the Raspberry Pi 5.
Whether you’re a hobbyist in the US, a tech-savvy teacher in the UK, or an entrepreneur exploring the best AI tools in 2025, this guide will walk you through the exact steps to build your own no-code AI image generator at home.
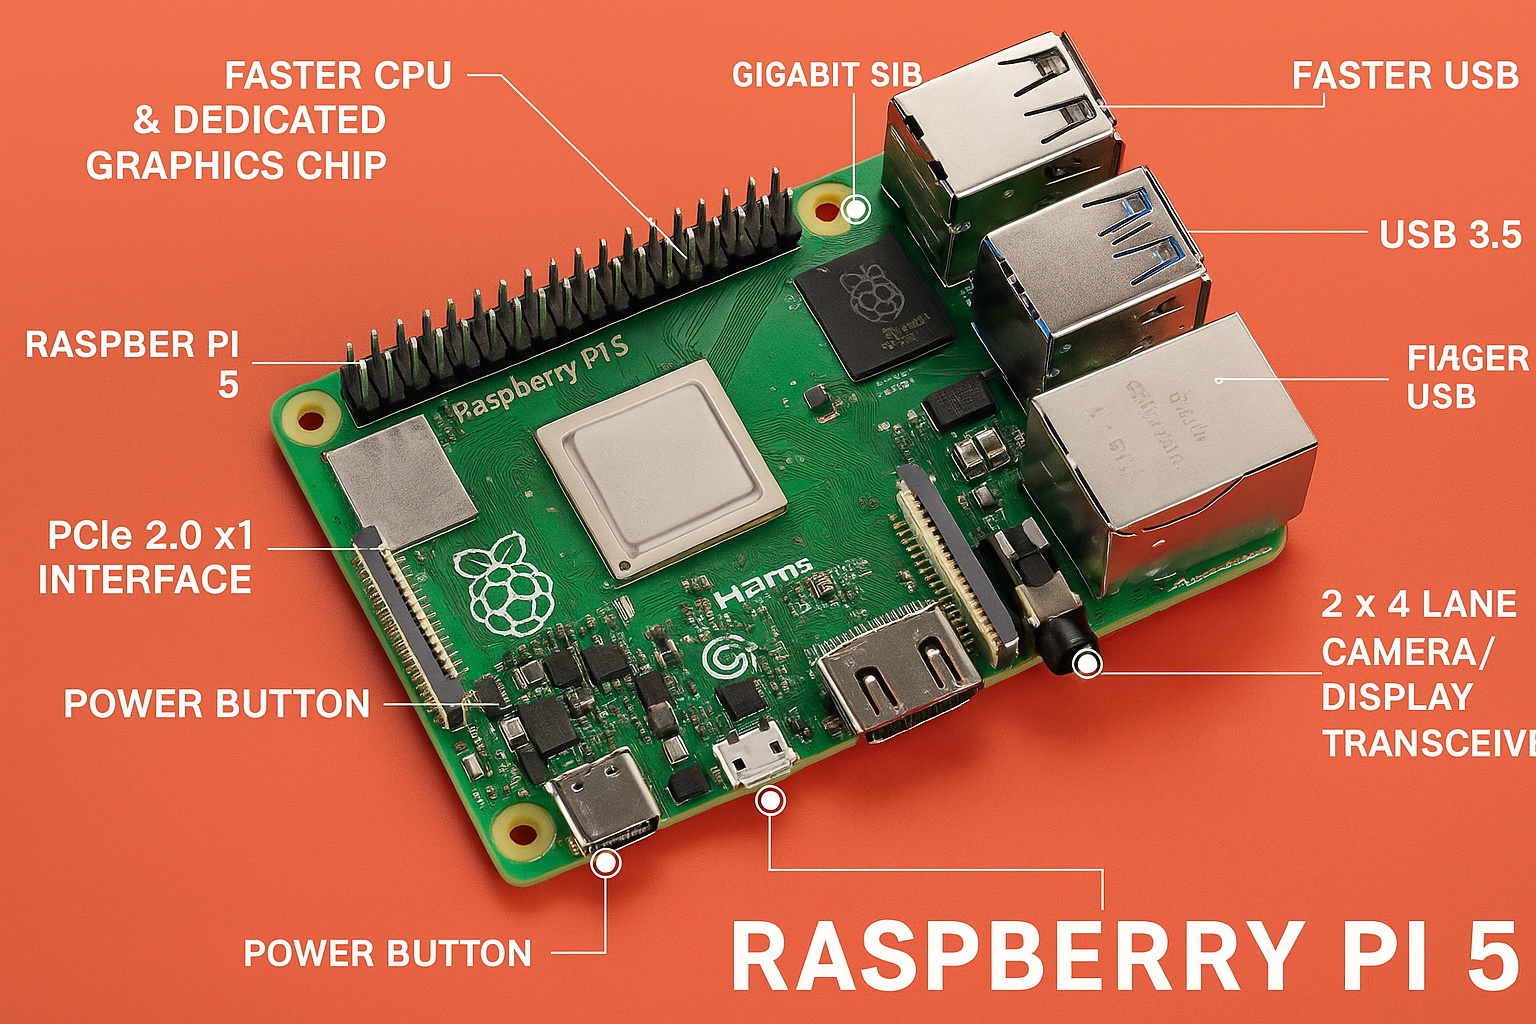
Why Use Raspberry Pi 5 for AI Image Generation?
The Raspberry Pi 5 is a huge leap from its predecessors. Here’s why it’s an excellent choice for AI projects:
- Faster CPU: Quad-core Arm Cortex-A76 at 2.4GHz
- Improved RAM options: Up to 8GB LPDDR4X
- PCIe support: For faster storage and hardware acceleration
- Better thermal design: Supports sustained workloads
Combined with the no-code revolution in 2025, this makes the Pi 5 an ideal low-cost platform to explore generative AI.
What You Can Build: Real-World Use Cases
- AI Art Kiosk: Set up a local image generator for exhibitions
- Educational Tool: Let students create images from text prompts
- Creative Marketing: Generate quick visuals for social media or client proposals
- Smart Home Integration: Automatically generate holiday cards or memes from voice commands
Let’s now explore how to actually build this.
Tools & Components You’ll Need
Hardware
| Item | Description | Estimated Price |
|---|---|---|
| Raspberry Pi 5 (8GB) | Main computing unit | ~$80 USD |
| Official Pi 5 Power Supply | Stable power source | ~$10 USD |
| 32GB+ microSD card or NVMe SSD | For OS and app storage | ~$20-$50 USD |
| USB Keyboard & Mouse | For initial setup | Already have or ~$20 USD |
| HDMI Monitor | For local display | Already have or ~$50 USD |
Software
- Raspberry Pi OS (Bookworm 64-bit)
- Node-RED: The core no-code engine
- Stable Diffusion Web UI (Local install)
- Python (pre-installed)
- Docker (Optional)
Online Services (Optional)
- Hugging Face Hub (free tier)
- Replicate (pay-per-use API for Stable Diffusion)
- OpenRouter.ai (for GPT-based text-to-image prompting)
Step-by-Step Guide: No-Code AI Image Generator Setup
Step 1: Set Up Raspberry Pi 5
- Flash Raspberry Pi OS to your microSD card using Raspberry Pi Imager.
- Connect your keyboard, mouse, and monitor.
- Boot it up, set your language (English – UK or US), and connect to Wi-Fi.
- Update your system:
sudo apt update && sudo apt full-upgrade -yStep 2: Install Node-RED
Node-RED is the glue between your input (text prompt) and the AI image generation. It allows you to build logic flows visually.
bash <(curl -sL https://raw.githubusercontent.com/node-red/linux-installers/master/deb/update-nodejs-and-nodered)
sudo systemctl enable nodered.service
Visit http://localhost:1880 to access the visual interface.
Step 3: Connect to an AI Image Model
You can either use:
- Local Stable Diffusion (heavier but runs offline)
- API-based tools like Replicate or Hugging Face (lighter, more flexible)
Option A: Use Replicate API (Recommended for No-Code)
- Create a free account on Replicate.com
- Get your API key
- Install
node-red-node-openaipackage in Node-RED palette - Set up a flow:
- Text Input: UI to type your image prompt
- Function Node: Format API request
- HTTP Request Node: Send to Replicate
- Image Viewer: Show result in dashboard
No Python, no CUDA drivers. Just drag and drop.
Option B: Run Stable Diffusion Locally
- Install Docker (or manually set up Python venv)
- Pull an optimized Stable Diffusion Docker image for ARM64 (like
runpod/stable-diffusion) - Use Node-RED to send prompts and receive generated images
Note: Raspberry Pi 5 won’t match GPU-level performance. Expect 2-3 minutes/image.
Add a Web UI Using Node-RED Dashboard
Make your AI image generator accessible via browser:
- Install
node-red-dashboardfrom the palette - Create a layout:
- Text box: For user prompt input
- Dropdown: Choose image style (realistic, anime, art, etc.)
- Button: Trigger generation
- Image widget: Display result
Now you have your very own web app, hosted locally on the Pi 5.
Add Voice Input (Optional But Fun!)
Why not make it hands-free?
- Plug in a USB microphone
- Install
speech-to-textnode via Node-RED - Connect it to the text input node
Now you can say, “A cat in a spacesuit” and get a surreal image in under 2 minutes.
Real-World Case Study: Artist in Brighton, UK
Tom, a digital artist in Brighton, wanted to exhibit AI-generated art at a gallery with no internet access. He:
- Used Raspberry Pi 5
- Installed local Stable Diffusion with Docker
- Set up Node-RED for prompt and image handling
- Displayed real-time generations on a wall-mounted screen
He created over 200 custom artworks in a weekend, with no cloud fees or coding headaches.
Tips for Faster Performance
- Use NVMe SSD via Pi 5’s PCIe slot
- Reduce image size to 512×512
- Stick to Replicate or Hugging Face API for quick response
- Enable swap space to assist with heavy models
Troubleshooting Common Issues
| Issue | Solution |
| Node-RED crashes | Check logs with journalctl -f -u nodered |
| API not responding | Check your API key and internet connection |
| Image not displaying | Ensure Node-RED dashboard image node uses correct URL format |
| Slow generation | Switch to API instead of local Stable Diffusion |
What Can You Build Next?
- AI meme generator: Auto-caption images with GPT
- Voice + Image assistant: Turn spoken ideas into visuals
- AI-powered photo booth: For weddings and events
- Artistic therapy tool: Patients describe feelings; AI turns them into art
You’ve now got a powerful tool that runs locally, visually programmed, and powered by the future of AI.
Conclusion: No-Code AI Meets Raspberry Pi Power
Building an AI image generator used to be a complex task needing advanced GPUs and deep coding skills. But with tools like Node-RED and Raspberry Pi 5, anyone can now turn their ideas into art, automate visual creation, or even teach students about machine learning hands-on.
Whether you’re in the US or UK, this project brings together creativity, technology, and the DIY spirit like never before.